[파이썬 플라스크] 간단한 유저 페이지 만들기
업데이트:
개요
이전 게시글에서 배운 항목을 토대로 간단한 사이트를 만들어보자.
유저를 생성, 수정, 삭제하고 정보 열람도 가능한 사이트이다.
테스트 유저 테이블 생성
PRIMARY KEY 역할을 하는 id와 이름, 나이, 간단한 자기 소개를 갖는 테이블을 작성해주었다.
1
2
3
4
5
users = [
    {'id': 1, 'name': '홍길동', 'age': 20, 'msg': '플라스크를 공부 중인 홍길동입니다.'},
    {'id': 2, 'name': '고영희', 'age': 28, 'msg': '고양이 아닙니다. 고영희입니다.'},
    {'id': 3, 'name': '이철수', 'age': 22, 'msg': '"철수야 철수하자" 드립치면 법정에서 뵙겠습니다.'},
]
유저 데이터 가져오기
각각의 유저를 불러와 이름을 표시하고, 클릭할 경우 상세 정보 페이지로 넘어가는 리스트를 생성할 함수를 장성해주었다.
1
2
3
4
5
6
def get_users():
    li_tags = ''
    for user in users:
        li_tags = li_tags + \
            f'<li><a href="/read/{user["id"]}/">{user["name"]}</a></li>'
    return li_tags
for 문을 이용해 users에 있는 user 하나씩 html 태그로 만들어 li_tags 변수에 추가해준다.
여러 줄을 입력하는 것이기 때문에 \를 추가해주었다.
메인 페이지 작성
메인 페이지에는 존재하는 페이지로 이동하는 링크를 걸어두고 싶어 url_for()를 이용하였다.
1
2
3
4
5
6
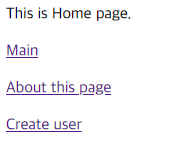
@app.route('/')
def index():
return 'This is Home page.' \
f'<p><a href="{url_for("index")}">Main</a></p>' \
f'<p><a href="{url_for("about_page")}">About this page</a></p>' \
f'<p><a href="{url_for("create")}">Create user</a></p>'
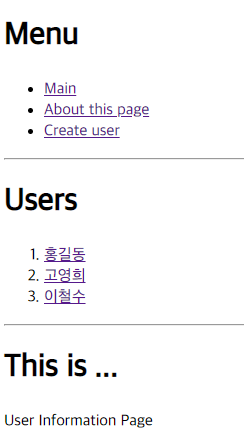
About 페이지 작성
about 페이지에는 간단하게 소개글만 작성해주었다.
1
2
3
@app.route('/about_page')
def about_page():
    return template(get_users(), '<h1>This is ...</h1> User Information Page')
template 만들기
앞으로 만들 페이지에는 아래와 같은 요소들이 들어갈 것이다.
- 페이지 리스트
- 유저 리스트
- 각 페이지 별 내용
하지만 페이지 리스트와 유저 리스트를 매번 반복하여 적어주기에는 무리가 있을 것이다.
따라서, 함수를 이용해 반복되는 항목들을 처리할 것이다.
1
2
3
4
5
6
7
8
9
10
11
12
13
14
15
16
17
18
19
20
21
22
23
24
25
26
27
28
29
def template(contents, content, id=None):
    contextUI = ''
    if id != None:
        contextUI = f'''
            <li><a href="/update/{id}/">update</a></li>
            <li><form action="/delete/{id}/" method="POST"><input type="submit" value="delete"></form></li>
        '''
    return f'''<!doctype html>
    <html>
        <body>
            <h1>Menu</h1>
            <ul>
                <li><a href="{url_for("index")}">Main</a></li>
                <li><a href="{url_for("about_page")}">About this page</a></li>
                <li><a href="{url_for("create")}">Create user</a></li>
            </ul>
            <hr>
            <h1>Users</h2>
            <ol>
                {contents}
            </ol>
            <hr>
            {content}
            <ul>
                {contextUI}
            </ul>
        </body>
    </html>
    '''
위의 template() 함수는 contents, content, id를 받아 html 파일을 리턴해준다.
- contents: 유저 리스트
- content: 각 페이지별 보여줄 내용
- contextUI: 특정 유저의 화면을 보고 있을 경우 수정, 삭제 버튼 표시
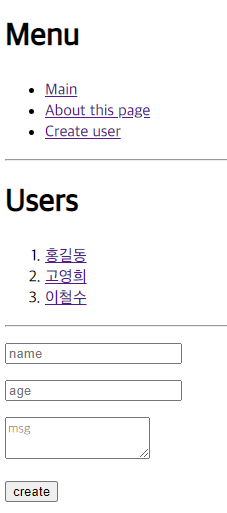
Create User
유저 생성의 경우 값을 입력 받아 기존 리스트에 추가해주는 작업이다.
전에 배운 http methods를 활용하였다.
input 태그와 textarea 태그를 이용해 사용자가 값을 입력하면 각 태그의 name 속성을 이용하여 그 값에 접근할 수 있다.
request.form['태그의 name 속성']
여기서 생각해주어야 하는 것이 있다.
값을 입력하는 url과 전송하는 url이 같으므로 따로 처리를 해주어야 한다는 것이다.
아래 코드를 보자.
1
2
3
4
5
6
7
8
9
10
11
12
13
14
15
16
17
18
19
20
21
22
@app.route('/create/', methods=['GET', 'POST'])
def create():
    if request.method == 'GET':
        content = '''
            <form action="/create/" method="POST">
                <p><input type="text" name="name" placeholder="name"></p>
                <p><input type="number" name="age" placeholder="age"></p>
                <p><textarea name="msg" placeholder="msg"></textarea></p>
                <p><input type="submit" value="create"></p>
            </form>
        '''
        return template(get_users(), content)
    elif request.method == 'POST':
        global next_id
        name = request.form['name']
        age = request.form['age']
        msg = request.form['msg']
        newuser = {'id': next_id, 'name': name, 'age': age, 'msg': msg}
        users.append(newuser)
        url = '/read/' + str(next_id) + '/'
        next_id = next_id + 1
        return redirect(url)
if 문으로 request method 방식이 GET 인가 POST 인가를 구분해주고 있다.
- GET: 값 입력 url
- POST: 값 전송 url
따라서 POST 방식일 경우 값 전송후 입력한 유저의 상세 페이지로 redirect 하게 된다.
Read User
유저 정보 조회의 경우 테이블을 탐색하면서 입력 받은 id와 같은 유저를 표시해주면 된다.
이때 id는 int 형이므로 직접 형 변환 또는 url에 자료형 명시(flask가 형 변환)를 해주자.
1
2
3
4
5
6
7
8
9
10
11
@app.route('/read/<int:id>/')
def read(id):
    name = ''
    msg = ''
    for user in users:
        if id == user['id']:
            name = user['name']
            age = user['age']
            msg = user['msg']
            break
    return template(get_users(), f'<h2 style="display:inline;">{name}</h2> ({age} 세)</p> {msg}', id)

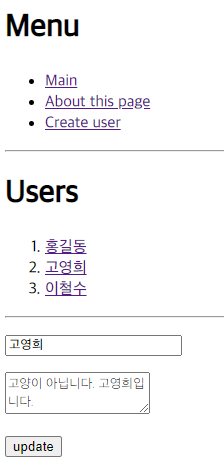
Update User
유저의 정보 수정은 create 함수와 비슷하다고 볼 수 있다.
똑같이 값을 입력하는 url과 전송하는 url이 같으므로 if문으로 구분을 해주었다.
하지만 특정 유저의 값만 바꾸는 것이기에 for문으로 유저들을 탐색하고 수정을 원하는 id와 같은 유저의 정보를 수정해주어야 한다.
1
2
3
4
5
6
7
8
9
10
11
12
13
14
15
16
17
18
19
20
21
22
23
24
25
26
27
28
29
@app.route('/update/<int:id>/', methods=['GET', 'POST'])
def update(id):
    if request.method == 'GET':
        name = ''
        msg = ''
        for user in users:
            if id == user['id']:
                name = user['name']
                msg = user['msg']
                break
        content = f'''
            <form action="/update/{id}/" method="POST">
                <p><input type="text" name="name" placeholder="name" value="{name}"></p>
                <p><textarea name="msg" placeholder="msg">{msg}</textarea></p>
                <p><input type="submit" value="update"></p>
            </form>
        '''
        return template(get_users(), content)
    elif request.method == 'POST':
        global next_id
        name = request.form['name']
        msg = request.form['msg']
        for user in users:
            if id == user['id']:
                user['name'] = name
                user['msg'] = msg
                break
        url = '/read/'+str(id)+'/'
        return redirect(url)
Delete User
파이썬 리스트로 된 유저 테이블이므로 remove() 함수를 이용하면 쉽게 구현할 수 있다.
1
2
3
4
5
6
7
@app.route('/delete/<int:id>/', methods=['POST'])
def delete(id):
    for user in users:
        if id == user['id']:
            users.remove(user)
            break
    return redirect('/')
마치며
다른 파일에 테이블을 작성하고 파일의 데이터를 읽어오고 싶었지만 아직 부족하여 하지 못했다.
조금 더 학습해서 그 부분을 해내고 싶다.
Notice: 이 게시물은 생활코딩 강의를 참고하였습니다.
댓글남기기